What are Elevation Certificates?
Elevation Certificates (ECs) are official FEMA forms completed by surveyors or engineers that document:- Building location and address
- Flood Insurance Rate Map (FIRM) information
- Building elevation measurements
- Construction type and foundation details
- Lowest floor elevation and Base Flood Elevation
- Relationship of the building to the Special Flood Hazard Area
- Floodplain management - Understand flood risk across the community
- Permit review - Verify new construction meets floodplain requirements
- CRS documentation - Support Community Rating System compliance
How automated processing works
When you upload an Elevation Certificate PDF, Forerunner automatically:- Detects the form version - Identifies whether it’s a 2009, 2012, 2015, 2018, 2022, or 2026 form
- Extracts the text - Uses OCR to read all text from the PDF
- Identifies sections - Determines which pages contain Sections A through G
- Extracts structured data - Pulls key information from each section:
- Section A: Building information, construction details
- Section B: Flood insurance rate map data
- Section C: Building elevation information
- Section D: Surveyor/engineer certification
- Section E: Building elevation diagrams
- Section F: Property photos
- Section G: Additional comments
- Geocodes the address - Finds the property location and links the EC automatically
- Creates a Certificate record - Stores extracted data in structured format
- Validates the data - Checks for common issues or missing information
After processing completes
After successful processing:- A Certificate record is created with all extracted data
- The EC is linked to the correct property automatically
- Extracted data is searchable and reportable
- You can view the certificate data alongside the original PDF
- The property page shows the certificate in the Elevation Certificates section
Reviewing processing results
Sometimes processing can’t complete automatically and requires review: Address not found The extracted address doesn’t match a property in your account. This happens when:- The property hasn’t been imported yet
- The address format differs from your property data
- The address was misread by OCR
Find the certificate
Open the Location tab
Review the extracted address
Correct the address
- Standardize abbreviations (e.g., “Street” to “St”)
- Add or remove unit numbers
- Fix OCR misreads (e.g., “0” instead of “O”)
Retry geocoding
Verify the match
- Elevation measurements
- Flood zone designations
- FIRM panel information
- Building construction details
Viewing certificate data
Access certificate data in multiple ways:Property page
Navigate to a property and view its Elevation Certificates section to see:- All ECs for the property with upload and issued dates
- Extracted certificate data in structured format
- Original PDF for download or viewing
- Processing status for recent uploads
Files table
The Files table shows all Elevation Certificates with:- Filterable columns for flood zone, elevation, certificate date
- Processing status indicator
- Quick links to properties
- Export capabilities for CRS reporting
Certificate-specific views
Your account may have saved views configured for common searches like:- “ECs uploaded this month”
- “Properties in Special Flood Hazard Area”
- “Finished construction certificates”
- “ECs with issues”
Extracted certificate fields
Forerunner extracts dozens of fields from each Elevation Certificate, including:Building information (Section A)
- Building address and legal description
- Building use (residential, non-residential)
- Construction type (new, substantial improvement)
- Building components (basement, crawlspace, enclosure)
- Latitude and longitude
FIRM data (Section B)
- FIRM Community Name and Number
- FIRM Panel Number and Suffix
- FIRM Panel Date
- Flood zone designation
- Base Flood Elevation
- National Geodetic Vertical Datum used
Elevation information (Section C)
- Lowest floor elevation (LAG)
- Lowest adjacent grade elevation
- Top of bottom floor elevation
- Top of next higher floor elevation
- Lowest elevation of machinery/equipment
- Garage floor elevation
Certification (Section D)
- Surveyor/Engineer name
- License number
- Certification date
- Signature verification
Sharing Elevation Certificates
Forerunner provides multiple ways to share Elevation Certificates with residents, insurance agents, and other stakeholders.Public website sharing
If your account has a public website enabled: Automatic sharing - Elevation Certificates marked as public are automatically available on your public website. Property owners and residents can:- Search for their property by address
- View all public Elevation Certificates for the property
- Download certificates as PDFs
- See when certificates were uploaded or updated
- Enable the public website
- Set Elevation Certificates to visible by default
- Configure which properties appear on the public website
- Customize the website appearance and messaging
Email sharing
Share individual Elevation Certificates via email:Find the certificate
Click Share
Enter recipient details
- Recipient name
- Email address
- Optional message explaining why you’re sharing the certificate
Send
- Link to view the certificate on the public website
- Property address and certificate details
- Your custom message (if included)
Public website uploads
Allow property owners to upload their own Elevation Certificates: Enable public website uploads - Work with your CSM to activate this feature Property owner workflow:- Visit your public website
- Search for their property
- Click “Upload Elevation Certificate”
- Select their EC file
- Submit for processing
- Uploaded ECs process automatically
- Staff can review to ensure correct property linkage
- Approve or reject uploads if verification is required
Bulk operations
For large volumes of Elevation Certificates, Forerunner supports bulk processing:Bulk upload options
CSV-based bulk upload - Upload multiple ECs at once using a CSV file to specify:- File paths or URLs
- Property addresses or IDs
- Document types and metadata
- Issued dates
Bulk export
Export Elevation Certificate data in multiple formats:Open Files table
Filter to Elevation Certificates
- Date range (uploaded or issued date)
- Flood zone location
- Finished vs. unfinished construction
- Specific properties or areas
Click Export Data
Select export type
- CSV - Spreadsheet with all certificate data
- Geopackage - GIS format with property locations
- ZIP - Includes both data and original PDF files
- Filter by FIRM location (specific flood zones)
- Include only finished construction
- Select date range for certificate dates
Configure and export
- CRS annual reporting
- Community-wide analysis
- Backup and archival
- Sharing with regional planning agencies
- Insurance rate studies
CRS compliance support
Forerunner’s Elevation Certificate features support Community Rating System (CRS) compliance:Activity 430 - Elevation Certificates
CRS requirement: Maintain and provide Elevation Certificates for properties in the Special Flood Hazard Area Forerunner support:- Automated EC collection and organization
- Public website for resident access to their ECs
- Searchable database of all certificates
- Export capabilities for CRS documentation
- Audit trails showing when ECs were uploaded and by whom
Record keeping
Forerunner automatically tracks:- When each EC was uploaded
- Who uploaded it
- Processing status and history
- Property linkage and issue tracking
- Public access and sharing history
Reporting
Generate reports for CRS documentation:- Count of ECs by flood zone
- ECs collected in the past year
- Properties with vs. without ECs
- Finished vs. unfinished construction certificates
- Public access statistics
Certificate issues and quality control
Forerunner includes automatic checks to ensure certificate data quality:Automatic issue checks
After extraction, Forerunner checks:- Required fields present - Checks that critical fields have values
- Data format - Ensures dates, elevations, and coordinates are valid
- Flood zone consistency - Compares FIRM data to your configured flood map layers, including FEMA maps and any custom flood maps
- Address format - Validates address structure and components
- Certification completeness - Verifies surveyor information and signature section
Issues
When checks find problems:- Issues are flagged in the certificate record
- Staff can review and mark issues as “ignored” if acceptable
- Issue reports identify patterns across multiple certificates
- Certificates with issues can be reprocessed with updated rules
Quality improvement
Use issue results to:- Identify common surveyor errors in your community
- Provide feedback to surveyors on form completion
- Ensure data accuracy before using for flood insurance or permits
- Maintain high-quality data for CRS compliance
Form version support
FEMA has released multiple Elevation Certificate form versions over time. Forerunner automatically detects and processes: 2026 forms (latest) - Most recent form with updated sections and fields 2022 forms - Current standard form in wide use 2018 forms - Still commonly submitted from older building projects 2015 forms - Transitional form with some section changes 2012 forms - Legacy form occasionally encountered 2009 forms - Older form from properties with older construction The form version is automatically detected, so you don’t need to specify it during upload. All versions are processed with the same automated workflow.Best practices
Request high-quality scans from surveyors
Request high-quality scans from surveyors
- Scanned at 300 DPI or higher
- Clearly legible with good contrast
- Free from skew or rotation
- Complete (all pages included)
Upload certificates promptly
Upload certificates promptly
- Automated processing reduces backlog
- Certificates are available for permit review immediately
- Property owners can access their ECs sooner
- CRS documentation stays current
Always manually review extracted data
Always manually review extracted data
- Compare extracted values against the original PDF
- Verify critical fields like elevations and flood zones
- Check that property linkage is correct
- Flag any extraction errors for correction
- Review warnings and address issues
Enable public website access
Enable public website access
- Reduces information request workload
- Improves transparency with residents
- Supports CRS Activity 430 requirements
- Helps property owners with insurance claims
Configure public website uploads
Configure public website uploads
- Reduces staff data entry work
- Empowers residents to maintain records
- Keeps certificate database current
- Builds community engagement
Export regularly for backups
Export regularly for backups
- Backup for disaster recovery
- Archival for CRS verification visits
- Sharing with regional agencies
- Annual reporting requirements
Train staff on reviewing extractions
Train staff on reviewing extractions
- Check extracted data against original PDFs
- Correct geocoding errors
- Mark issues appropriately
- Escalate processing problems to your CSM
Maintain property data quality
Maintain property data quality
- Import properties before uploading ECs when possible
- Standardize address formats
- Keep property data current
- Include common address variations
Troubleshooting
My Elevation Certificate failed property matching
My Elevation Certificate failed property matching
- Address format differences (e.g., “Street” vs. “St.”)
- Property not yet imported
- OCR misread the address
Extracted data doesn't match the certificate
Extracted data doesn't match the certificate
- Poor quality scans
- Handwritten forms
- Forms with unusual formatting
- Damaged or faded PDFs
- Review the extracted data
- Manually correct misread fields
- Reprocess with improved OCR settings if needed
The certificate is stuck in 'Extracting text'
The certificate is stuck in 'Extracting text'
- Refresh the page to check if status updated
- Verify the file is a valid PDF (not corrupted)
- Check file size (very large files take longer)
- Contact your Customer Success Manager if still stuck after 30 minutes
I uploaded the wrong certificate
I uploaded the wrong certificate
- Wait for processing to complete (don’t delete while processing)
- Navigate to the property or Files table
- Find the incorrect certificate
- Click delete/trash icon
- Confirm deletion
- Upload the correct certificate
The certificate is linked to the wrong property
The certificate is linked to the wrong property
- Unlink the certificate from the wrong property
- Relink it to the correct property
- Verify the address in the certificate matches the correct property
- Multiple properties have similar addresses
- The certificate address format is ambiguous
- OCR slightly misread the address
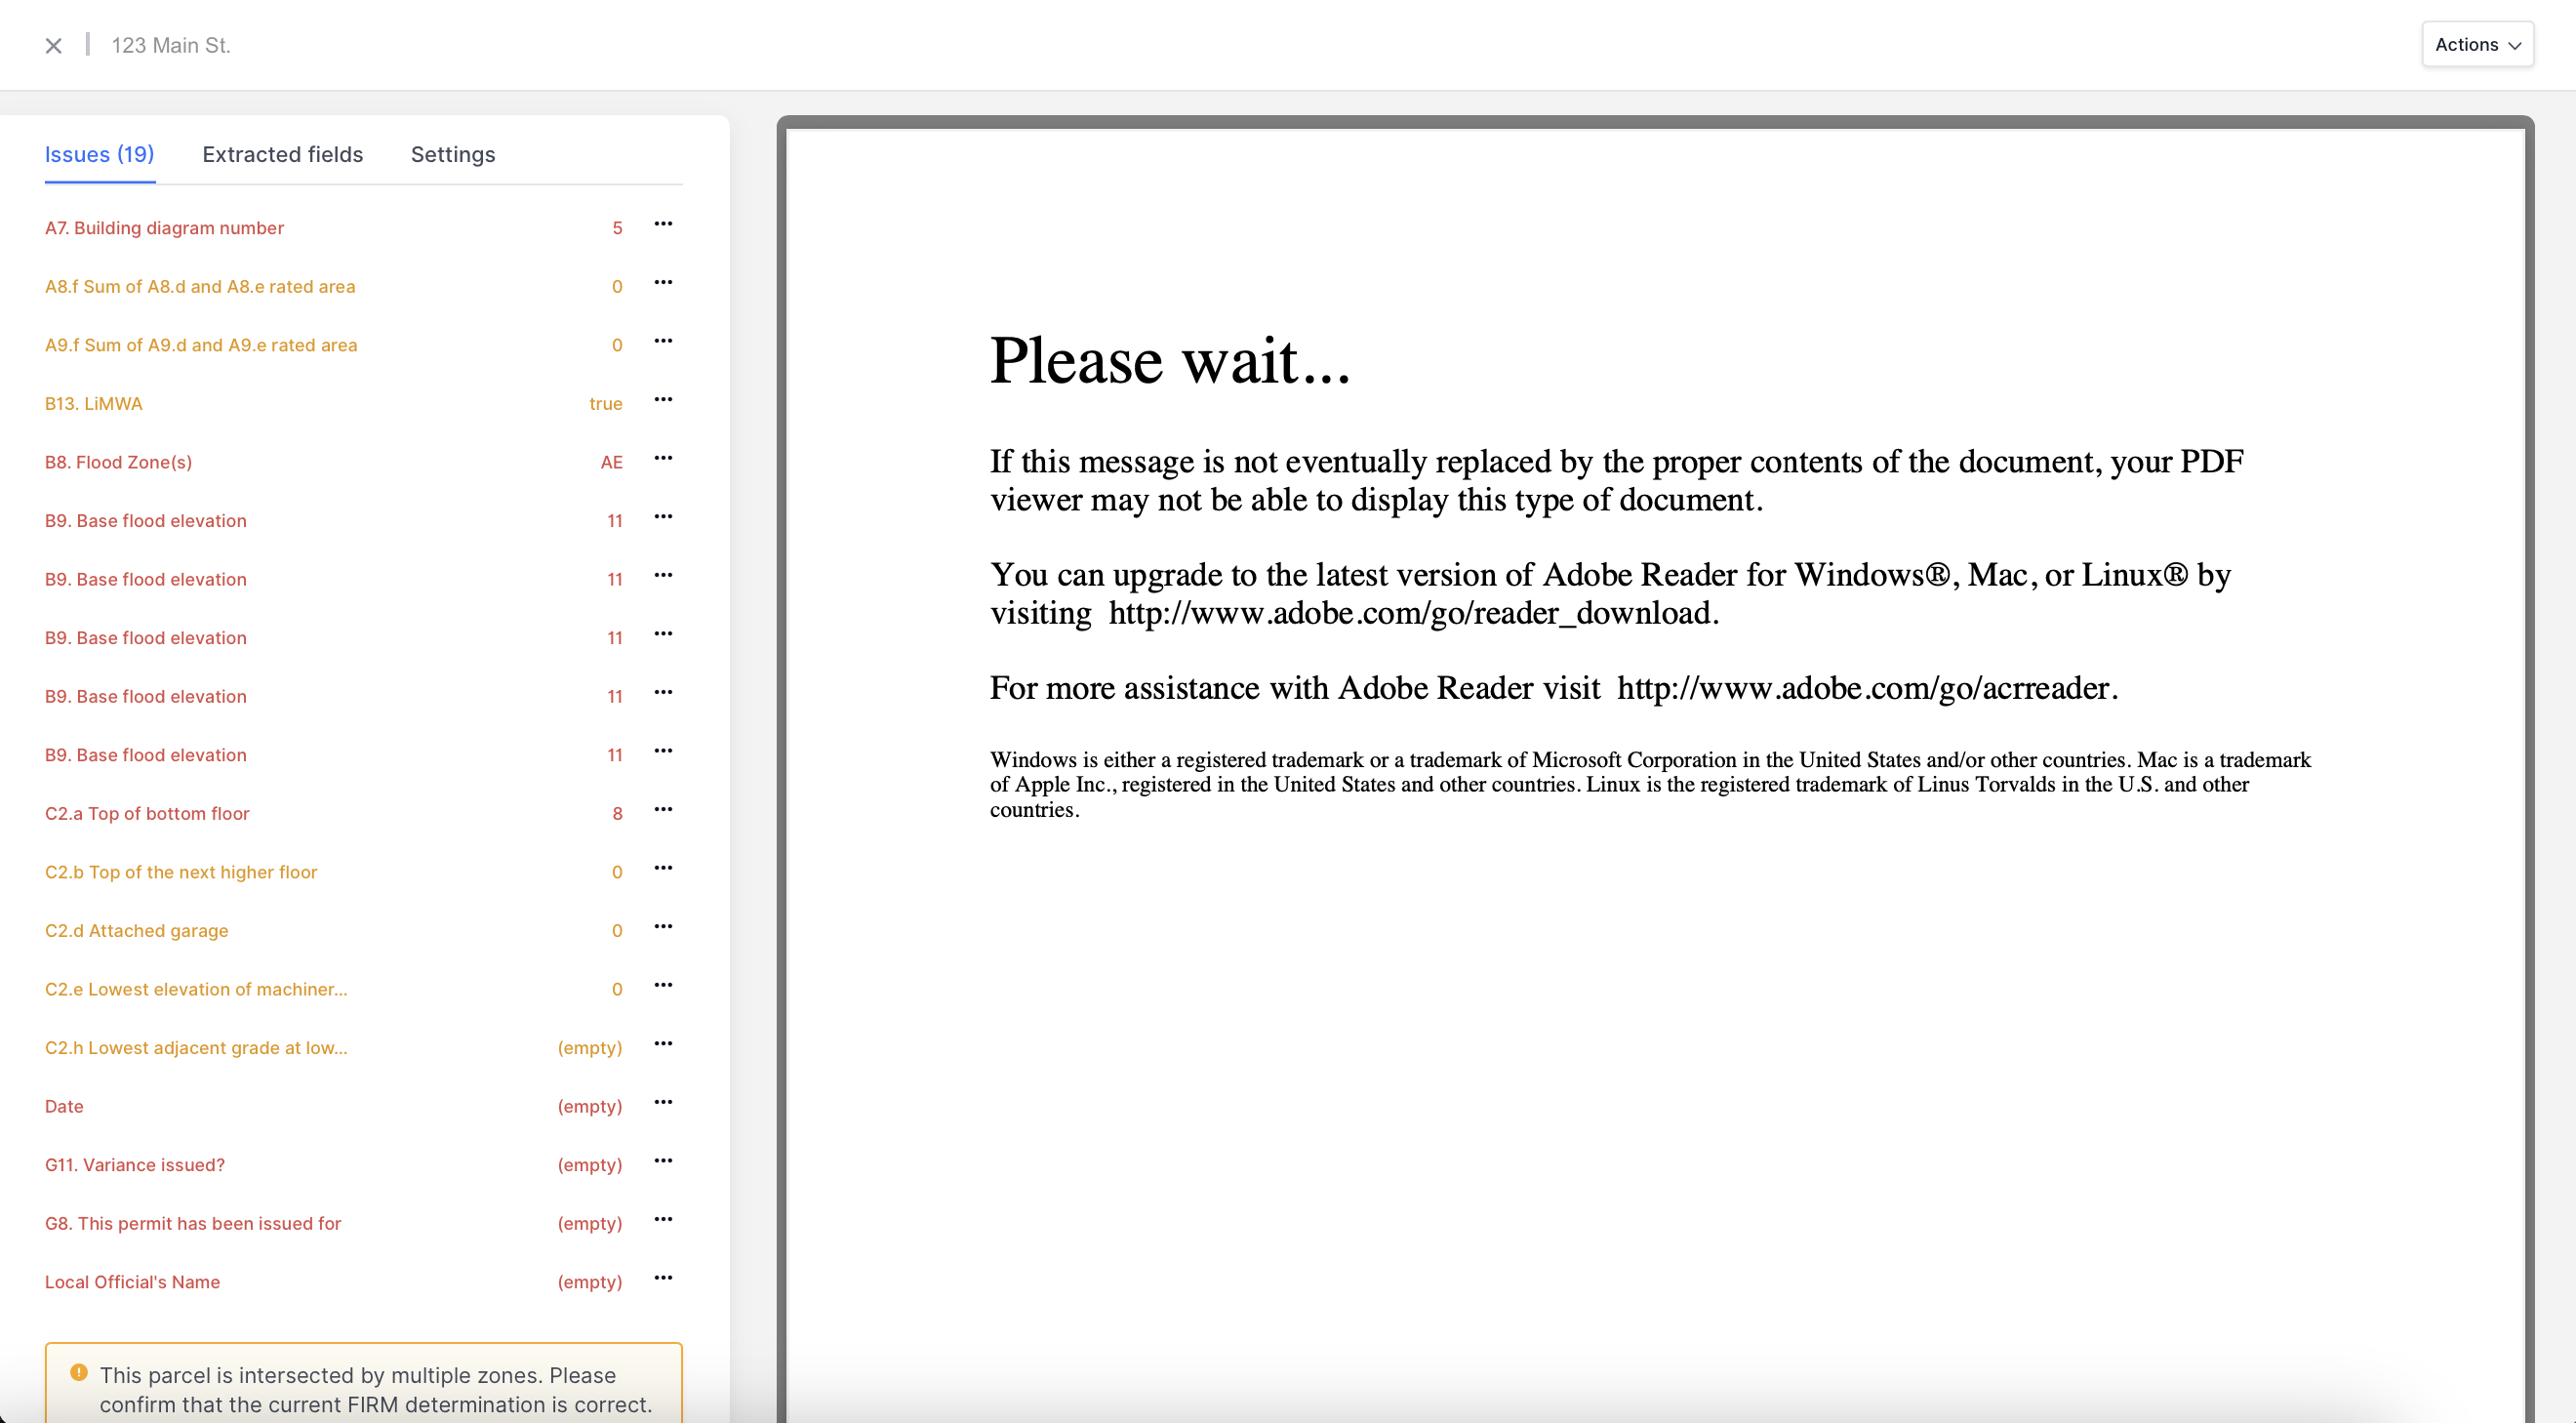
"Please Wait" error when viewing 2026 Elevation Certificates
"Please Wait" error when viewing 2026 Elevation Certificates
I can't see the extracted certificate data
I can't see the extracted certificate data
- Wait for processing to fully complete (status shows “Complete”)
- Refresh the property page
- Verify you have permissions to view certificate data
- Check that the certificate didn’t fail property matching
Issues are showing false positives
Issues are showing false positives
- Mark specific issues as “ignored” if they don’t apply
- Adjust issue rules to match your community standards
- Disable certain issue checks if they’re not useful
I need to reprocess an old certificate
I need to reprocess an old certificate
- Issue rules have been updated
- Extraction algorithms have improved
- Property data has been corrected
- Reprocess individual certificates
- Bulk reprocess certificates from a specific time period
- Run updated issue checks on existing certificates